 Sidetone
Sidetone Guide
Przewodnik po Sidetone
Getting started
Sidetone teaches Morse code by ear and by hand. You listen, type what you hear, and key it back on a real key or on the keyboard. Characters come one at a time, in the Koch order, and you add the next one only when the previous set is solid.
The sidebar
- Receive: Sidetone plays characters or groups, you type what you heard.
- Send: free keying with the decoder, to check your hand and your timing.
- Echo: Sidetone sends a short group, you key it back.
- Copy: a character or group is shown on screen, you send it.
- Words: common words, CW abbreviations and callsigns built from the characters you already know.
- Progress: how each character is doing and how your sessions have gone.
How to use
- Start in Receive. The set begins with two characters. Press Return and type each character as soon as you hear it.
- Add the next character after a Groups or Single session at 90% or better with at least 10 characters, or after a finished Mastery session. The new character opens as a card: see it, hear it, then warm up on it before the next session.
- Connect a key or pick keyboard paddles in Settings. Then open Echo and key back what you hear.
- Move to Words once the set is big enough to build words from.
Notes
- Settings live under ⌘,. Tabs: Key, Audio and Training.
- Receiving and sending have separate character sets. Each grows on its own.
- All data stays in the app container on this Mac. Nothing is sent to a cloud.
Connecting a key
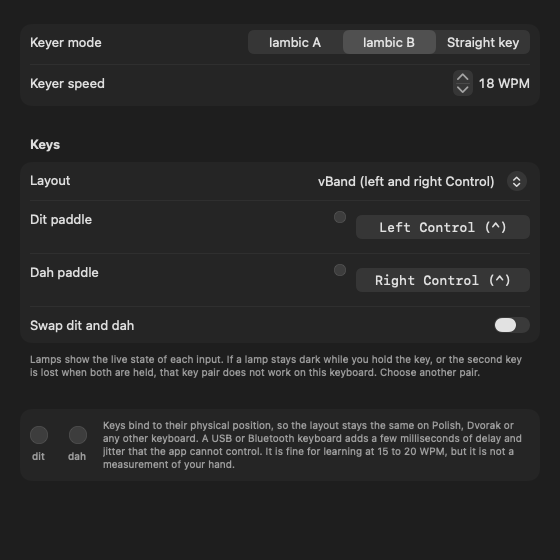
Sidetone reads the key through the keyboard. Any adapter that presents itself as a keyboard works right away: a vBand adapter, a homemade USB board, a paddle wired to a keyboard controller. No driver, no pairing inside the app.
How to use
- Plug the adapter in and open Settings, tab Key.
- Pick the preset that matches the adapter. vBand uses the left and right Control keys.
- Squeeze the paddles. The dit and dah lamps light with every press.
- In Send, press the paddles and watch the decoded text appear.
Notes
- Presets: vBand (left and right Control), One hand (, and .), Arrow keys, Custom. For Custom, click a field and press the key you want.
- Straight key uses the left Control key. Set the keyer mode to Straight key as well.
- If the second lamp stays dark when you squeeze both paddles, the keyboard drops that key. Pick another pair.
- No key at hand? Use the mouse pad in Send, Echo and Copy: left button is dit, right button is dah.
- Keys bind to their physical position, so the layout is the same on any keyboard.
Receive
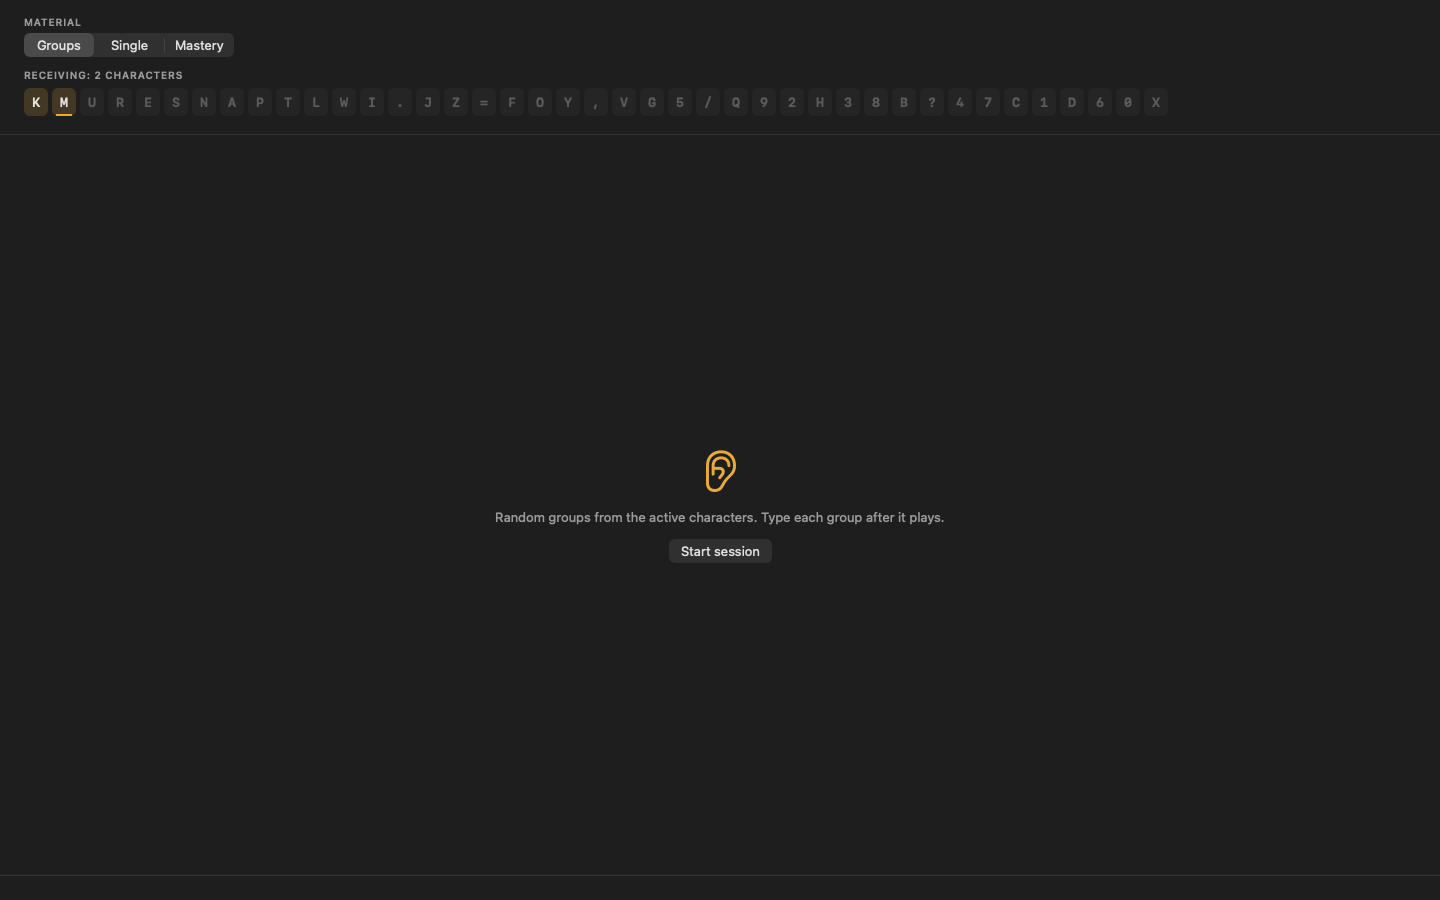
Sidetone plays a character or a group. You type what you heard. The result shows every character next to the one that was sent.
How to use
- Pick the material: Groups, Single or Mastery.
- Press Start session or Return.
- Wait for "Listen…", then type what you heard.
- With Groups, press Return to submit. Single and Mastery submit as soon as you type the character.
- Read the result. Add the next character after a Groups or Single session at 90% or better with at least 10 characters, or after a finished Mastery session.
Notes
- Return with an empty field plays the current item again.
- Press ⌘/ or the ? button to see the pattern of the current item. Use it when stuck, not before every item.
- The Koch bar above the field shows the sequence. Click a character to set the active set up to that character.
- Two speeds: character WPM is the speed of each character, effective WPM is the spacing between them. Set both in Settings, tab Training, section Speed. Keep the character speed up and stretch the spacing while you learn.
- Mastery keeps going until every character in the set scores the target number of hits. A miss costs a point for both the expected and the typed character. Finishing unlocks the next character regardless of the percentage. Set the target (2 to 5, default 3) and the miss limit (Unlimited, 3 or 5) in Settings, tab Training. With a limit, the session stops at the N-th miss and does not unlock anything.
- Add next character after a result, or a click on the Koch bar one character past the set, opens the new character card: the character, its pattern, one play. Start warm-up plays single characters, the new one and the two before it, until the new one scores the Mastery target. Nothing is recorded. Skip (⌘.) closes the card and keeps the character in the set. Option-click any active character on the Koch bar to review it.
Send
Free keying. Press the paddles and the decoded text appears on screen, read straight from the keyer. Use it to warm up, to check a character, or to see how even your timing is.
How to use
- Open Send.
- Set the keyer mode (Iambic A, Iambic B or Straight key) and the keyer WPM in Settings, tab Key.
- Key. Each decoded character appears as you finish it.
- Press Clear (⌘K) to start over.
Notes
- Timing measured here comes from the keyboard, not from your hand. A USB or Bluetooth keyboard adds a few milliseconds of delay and jitter that the app cannot control. It is fine for learning at 15 to 20 WPM.
- The mouse pad is a paddle: left button is dit, right button is dah. The middle button clears the text.
- Nothing is scored in Send. For scored sending use Echo or Copy.
Echo
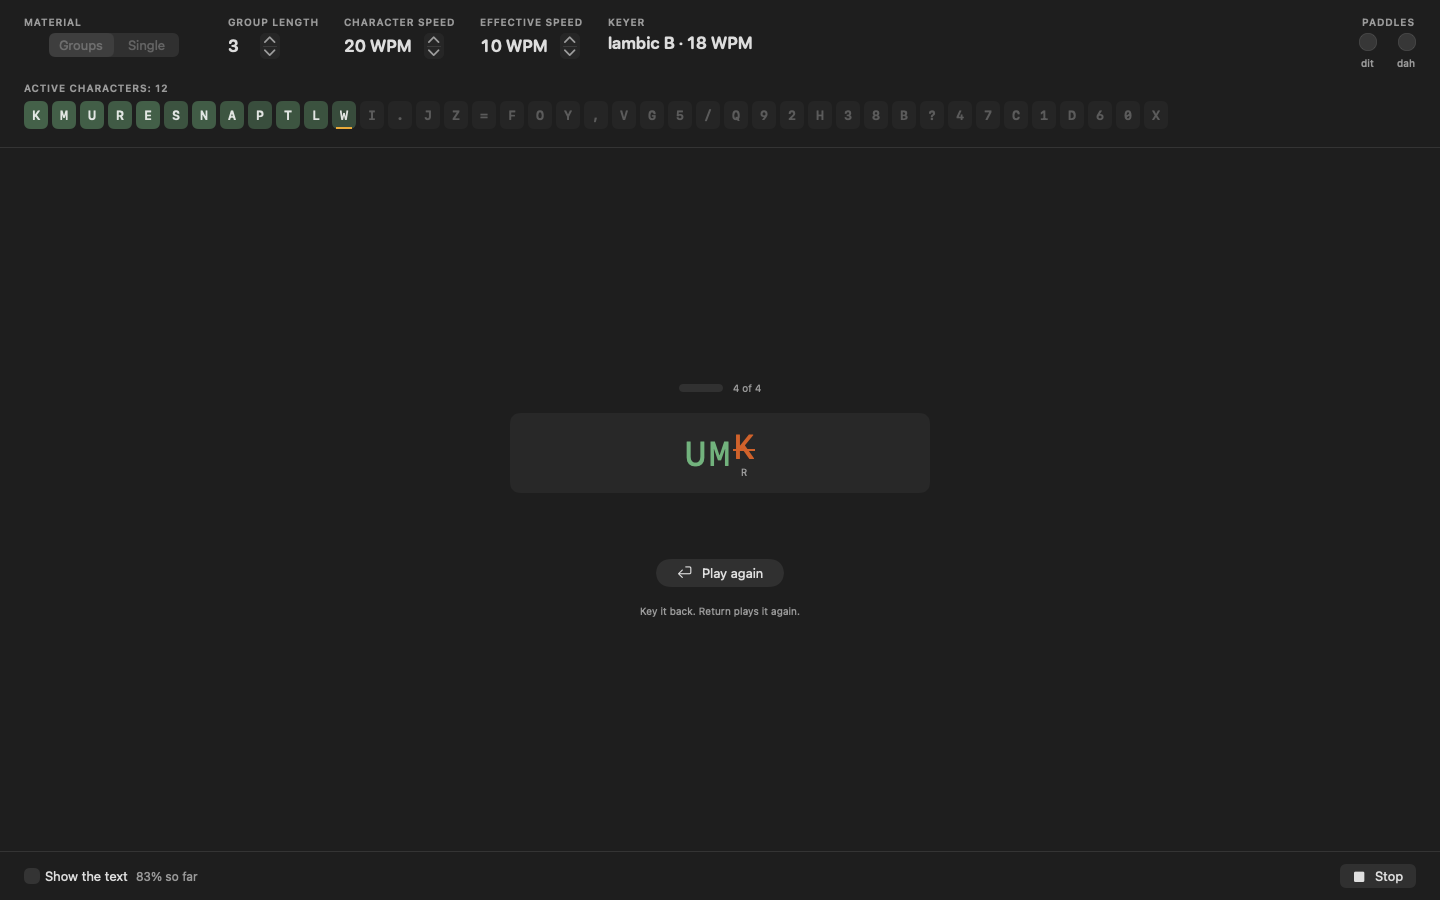
Sidetone sends a short group. You key it back. The result shows both side by side, character by character.
How to use
- Pick the material: Groups, Single or Mastery.
- Press Start echo or Return.
- Wait for "Listen…", then key what you heard.
- Stop keying. Two seconds of silence end your answer.
- Read the result: a wrong character is struck through, the expected one sits next to it.
Notes
- Return plays the current item again.
- Press / or the ? button to see the pattern of the current item. Use it when stuck, not before every item.
- Sending has its own character set, separate from Receive, with its own Koch bar. Add the next character after a Groups or Single session at 90% or better with at least 10 characters, or after a finished Mastery session.
- Mastery keeps going until every character in the set scores the target number of hits. A miss costs a point. Finishing unlocks the next character regardless of the percentage. With a miss limit set in Settings, the session stops at the N-th miss and does not unlock anything.
- During a session the footer counts misses: characters keyed wrong so far in this session.
- Add next character after a result, or a click on the Koch bar one character past the set, opens the new character card: the character, its pattern, one play. Start warm-up sends single characters, the new one and the two before it, and you key each one back until the new one scores the Mastery target. Nothing is recorded. Skip (⌘.) closes the card and keeps the character in the set. Option-click any active character on the Koch bar to review it.
Copy
A character or a group appears on screen. You send it with the paddles. The result shows what you sent next to what was shown, character by character.
How to use
- Pick the material: Groups, Single or Mastery.
- Press Start copy or Return.
- Read the item on screen and key it.
- Stop keying. Two seconds of silence end your answer.
- Read the result: a wrong character is struck through, the expected one sits next to it.
Notes
- Nothing is played before you send. The item is only shown. That is the difference from Echo.
- Press / or the ? button to see the pattern of the current item.
- Copy uses the sending character set, the same one as Echo. Add the next character after a Groups or Single session at 90% or better with at least 10 characters, or after a finished Mastery session.
- Mastery keeps going until every character in the set scores the target number of hits. A miss costs a point. Finishing unlocks the next character regardless of the percentage. With a miss limit set in Settings, the session stops at the N-th miss and does not unlock anything.
- During a session the footer counts misses: characters keyed wrong so far in this session.
- Add next character after a result, or a click on the Koch bar one character past the set, opens the new character card: the character, its pattern, one play. Start warm-up shows single characters, the new one and the two before it, and you key each one until the new one scores the Mastery target. Nothing is recorded. Skip (⌘.) closes the card and keeps the character in the set. Option-click any active character on the Koch bar to review it.
Words and callsigns
The same flow as Receive, with real material: common words, CW abbreviations and callsigns. Everything is built only from the characters active in your receiving set.
How to use
- Pick the material: Words or Callsigns.
- Press Start session or Return.
- Wait for "Listen…", then type what you heard and press Return.
- Read the result. Return with an empty field plays the item again.
Notes
- Words mixes everyday words with CW abbreviations such as CQ, TU or 73, as far as the active set allows.
- Callsigns follow a realistic shape: prefix, digit, suffix. They need at least one digit and a few letters in the active set.
- With a small set the list can be empty. Sidetone tells you so. Add more characters in Receive and come back.
- Speeds and the pattern hint (⌘/) work the same way as in Receive.
Progress
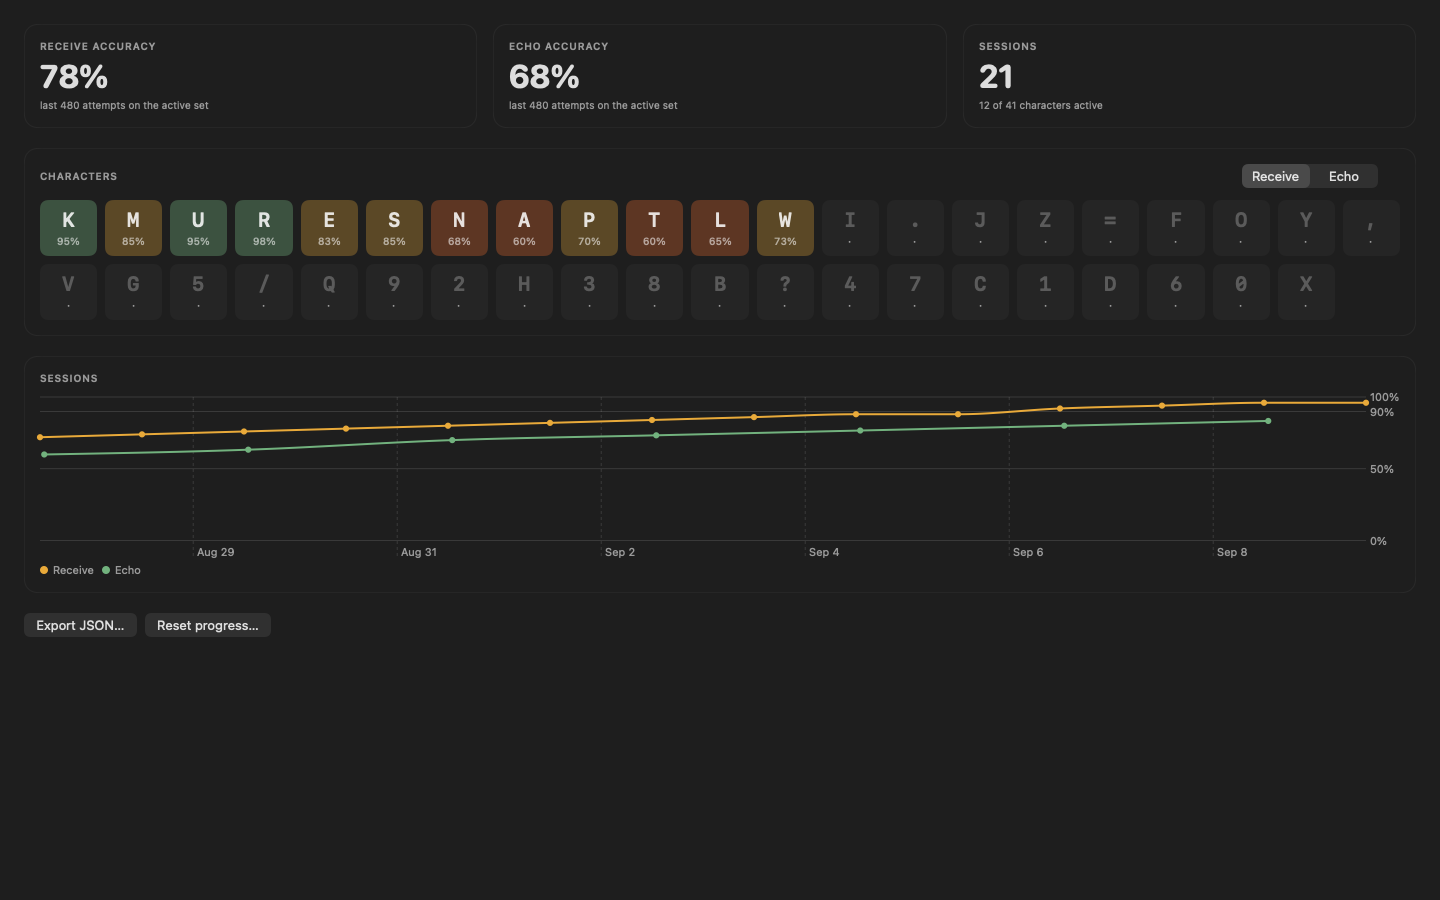
One place for the numbers: how each character is doing and how your sessions have gone, for receiving and for sending.
How to use
- Open Progress.
- Read the character grid. Each cell shows the hits over the last 50 attempts on that character, and its pattern.
- Read the chart. One point per session, accuracy over time.
- Finish a session in any other section and the numbers update.
Notes
- The grid is information, not a gate. The next character unlocks with a single Groups or Single session at 90% or better with at least 10 characters, or with a finished Mastery session, not with the grid.
- Receiving and sending are tracked separately, each with its own character set.
- Export JSON… saves all sessions and character statistics to a file.
- Reset progress… deletes character statistics and session history. Settings stay.
Settings
Open with ⌘,. Three tabs: Key, Audio and Training. Changes apply right away.
How to use
- Key: pick a preset for the paddles, or Custom and press your own keys in the fields. Set the keyer mode (Iambic A, Iambic B, Straight key) and the keyer WPM.
- Audio: set the tone in Hz, the volume, and Edge softness in ms.
- Training: set the character speed and the effective speed in the Speed section, check the character order, set the Mastery target and the Mastery miss limit.
Notes
- Presets: vBand (left and right Control), One hand (, and .), Arrow keys, Custom. Straight key uses the left Control key.
- Edge softness is the rise and fall time of each tone. Below 3 ms it clicks, above 10 ms characters blur at 20 WPM. 5 ms is a safe default.
- Speed: character WPM is the speed of each character, effective WPM is the spacing between them (Farnsworth). Effective speed can never exceed character speed.
- The character order is the G4FON sequence. Letters, digits and . , ? / = are supported.
- Mastery target is the number of hits each character needs before a Mastery session ends: 2 to 5, default 3. A finished Mastery session unlocks the next character.
- Mastery miss limit ends a Mastery session at the N-th miss: Unlimited (default), 3 or 5. A session stopped by the limit does not unlock the next character.
- Settings and progress stay in the app container on this Mac. Nothing is sent to a cloud.
Keyboard shortcuts
Most of Sidetone runs from the keyboard, so your hands stay on the key.
Shortcuts
- Return: start a session, submit the answer in Receive and Words, play the item again in Echo and after a result.
- ⌘/: show the pattern of the current item in Receive and Words.
- /: show the pattern of the current item in Echo and Copy.
- Escape: stop the session.
- ⌘.: skip the new character card.
- Option-click on the Koch bar: review a character you already know.
- ⌘,: open Settings.
- ⌘?: open Help.
- Middle mouse button on the mouse pad: play again in Echo, show the pattern in Copy, clear in Send.
Notes
- The mouse pad is also a paddle: left button is dit, right button is dah.
- The paddle keys come from the preset in Settings, tab Key.
Pierwsze kroki
Sidetone uczy alfabetu Morse'a ze słuchu i z ręki. Słuchasz, wpisujesz to, co usłyszałeś, i odstukujesz to samo na prawdziwym kluczu albo na klawiaturze. Znaki dochodzą pojedynczo, w kolejności Kocha, a kolejny dodajesz dopiero wtedy, gdy poprzedni zestaw siedzi pewnie.
Pasek boczny
- Odbiór: Sidetone nadaje znaki albo grupy, Ty wpisujesz, co usłyszałeś.
- Nadawanie: swobodne kluczowanie z dekoderem, do sprawdzenia ręki i rytmu.
- Echo: Sidetone nadaje krótką grupę, Ty ją odstukujesz.
- Przepisywanie: na ekranie widać znak albo grupę, Ty to nadajesz.
- Słowa: częste słowa, skróty CW i znaki wywoławcze ułożone ze znaków, które już znasz.
- Postępy: jak idzie każdy znak i jak wypadły sesje.
Jak używać
- Zacznij od sekcji Odbiór. Zestaw startuje od dwóch znaków. Naciśnij Return i wpisuj każdy znak, gdy tylko go usłyszysz.
- Dodaj następny znak po sesji Grupy albo Pojedyncze z co najmniej 10 znakami na 90% lub lepiej, albo po ukończonej sesji Do skutku. Nowy znak otwiera się jako karta: zobacz go, posłuchaj i rozgrzej się na nim przed kolejną sesją.
- Podłącz klucz albo wybierz łapki na klawiaturze w Ustawieniach. Potem otwórz Echo i odstukuj to, co słyszysz.
- Przejdź do sekcji Słowa, gdy zestaw urośnie na tyle, żeby dało się z niego ułożyć słowa.
Uwagi
- Ustawienia są pod ⌘,. Zakładki: Klucz, Dźwięk i Trening.
- Odbiór i nadawanie mają osobne zestawy znaków. Każdy rośnie niezależnie.
- Wszystkie dane zostają w kontenerze aplikacji na tym Macu. Nic nie jest wysyłane do chmury.
Podłączenie klucza
Sidetone czyta klucz przez klawiaturę. Każdy adapter, który zgłasza się jako klawiatura, działa od razu: adapter vBand, własna płytka USB, łapki podpięte do kontrolera klawiatury. Bez sterownika i bez parowania w aplikacji.
Jak używać
- Podłącz adapter i otwórz Ustawienia, zakładka Klucz.
- Wybierz preset pasujący do adaptera. vBand używa lewego i prawego klawisza Control.
- Ściśnij łapki. Lampki dit i dah zapalają się przy każdym naciśnięciu.
- W sekcji Nadawanie naciśnij łapki i zobacz, jak pojawia się zdekodowany tekst.
Uwagi
- Presety: vBand (lewy i prawy Control), Jedna ręka (, i .), Strzałki, Własne. Przy Własne kliknij pole i naciśnij klawisz, którego chcesz użyć.
- Klucz sztorcowy używa lewego klawisza Control. Ustaw też tryb keyera na Klucz sztorcowy.
- Jeśli przy ściśnięciu obu łapek druga lampka nie zapala się, klawiatura gubi ten klawisz. Wybierz inną parę.
- Nie masz klucza pod ręką? Użyj pola myszy w sekcjach Nadawanie, Echo i Przepisywanie: lewy przycisk to dit, prawy to dah.
- Klawisze są wiązane z pozycją fizyczną, więc układ jest taki sam na każdej klawiaturze.
Odbiór
Sidetone nadaje znak albo grupę. Ty wpisujesz, co usłyszałeś. Wynik pokazuje każdy znak obok tego, który został nadany.
Jak używać
- Wybierz materiał: Grupy, Pojedyncze albo Do skutku.
- Naciśnij Zacznij sesję albo Return.
- Poczekaj na „Słuchaj…”, potem wpisz, co usłyszałeś.
- Przy materiale Grupy naciśnij Return, żeby wysłać odpowiedź. Pojedyncze i Do skutku wysyłają się same po wpisaniu znaku.
- Przeczytaj wynik. Dodaj następny znak po sesji Grupy albo Pojedyncze z co najmniej 10 znakami na 90% lub lepiej, albo po ukończonej sesji Do skutku.
Uwagi
- Return przy pustym polu odtwarza bieżący element ponownie.
- Naciśnij ⌘/ albo przycisk ?, żeby zobaczyć wzór bieżącego elementu. Korzystaj z tego, gdy utkniesz, nie przed każdym elementem.
- Pasek Kocha nad polem pokazuje sekwencję. Kliknij znak, żeby ustawić aktywny zestaw do tego znaku włącznie.
- Dwie prędkości: prędkość znaku to tempo każdego znaku, prędkość efektywna to odstępy między nimi. Ustaw obie w Ustawieniach, zakładka Trening, sekcja Tempo. W trakcie nauki trzymaj wysokie tempo znaku i rozciągaj odstępy.
- Do skutku trwa, aż każdy znak zestawu zdobędzie docelową liczbę trafień. Błąd zabiera punkt zarówno znakowi oczekiwanemu, jak i wpisanemu. Ukończenie odblokowuje następny znak niezależnie od procentu. Cel (od 2 do 5, domyślnie 3) i limit błędów (Bez limitu, 3 albo 5) ustawisz w Ustawieniach, zakładka Trening. Przy włączonym limicie sesja kończy się na N-tym błędzie i niczego nie odblokowuje.
- Dodaj następny znak po wyniku albo kliknięcie w pasek Kocha o jeden znak za zestawem otwiera kartę nowego znaku: znak, jego wzór, jedno odtworzenie. Zacznij rozgrzewkę puszcza pojedyncze znaki, nowy i dwa stojące przed nim, aż nowy zdobędzie cel z trybu Do skutku. Nic nie jest zapisywane. Pomiń (⌘.) zamyka kartę i zostawia znak w zestawie. ⌥-klik na dowolnym aktywnym znaku paska Kocha otwiera jego powtórkę.
Nadawanie
Swobodne kluczowanie. Naciskasz łapki, a zdekodowany tekst pojawia się na ekranie, czytany wprost z keyera. Przydaje się do rozgrzewki, do sprawdzenia znaku albo do zobaczenia, jak równy jest Twój rytm.
Jak używać
- Otwórz sekcję Nadawanie.
- Ustaw tryb keyera (Iambic A, Iambic B albo Klucz sztorcowy) i WPM keyera w Ustawieniach, zakładka Klucz.
- Kluczuj. Każdy zdekodowany znak pojawia się, gdy go skończysz.
- Naciśnij Wyczyść (⌘K), żeby zacząć od nowa.
Uwagi
- Mierzony tu rytm pochodzi z klawiatury, nie z Twojej ręki. Klawiatura USB albo Bluetooth dodaje kilka milisekund opóźnienia i jittera, na które aplikacja nie ma wpływu. Do nauki przy 15 do 20 WPM to wystarczy.
- Pole myszy działa jak łapki: lewy przycisk to dit, prawy to dah. Środkowy przycisk czyści tekst.
- W sekcji Nadawanie nic nie jest oceniane. Ocenę nadawania dają Echo i Przepisywanie.
Echo
Sidetone nadaje krótką grupę. Ty ją odstukujesz. Wynik pokazuje obie wersje obok siebie, znak po znaku.
Jak używać
- Wybierz materiał: Grupy, Pojedyncze albo Do skutku.
- Naciśnij Zacznij echo albo Return.
- Poczekaj na „Słuchaj…”, potem odstukaj, co usłyszałeś.
- Przestań kluczować. Dwie sekundy ciszy kończą odpowiedź.
- Przeczytaj wynik: błędny znak jest przekreślony, a obok stoi oczekiwany.
Uwagi
- Return odtwarza bieżący element ponownie.
- Naciśnij / albo przycisk ?, żeby zobaczyć wzór bieżącego elementu. Korzystaj z tego, gdy utkniesz, nie przed każdym elementem.
- Nadawanie ma własny zestaw znaków, osobny od odbioru, z własnym paskiem Kocha. Dodaj następny znak po sesji Grupy albo Pojedyncze z co najmniej 10 znakami na 90% lub lepiej, albo po ukończonej sesji Do skutku.
- Do skutku trwa, aż każdy znak zestawu zdobędzie docelową liczbę trafień. Błąd zabiera punkt. Ukończenie odblokowuje następny znak niezależnie od procentu. Przy limicie błędów ustawionym w Ustawieniach sesja kończy się na N-tym błędzie i niczego nie odblokowuje.
- W trakcie sesji stopka liczy błędy („Błędy: N”): znaki nadane źle od początku tej sesji.
- Dodaj następny znak po wyniku albo kliknięcie w pasek Kocha o jeden znak za zestawem otwiera kartę nowego znaku: znak, jego wzór, jedno odtworzenie. Zacznij rozgrzewkę nadaje pojedyncze znaki, nowy i dwa stojące przed nim, a Ty odstukujesz każdy, aż nowy zdobędzie cel z trybu Do skutku. Nic nie jest zapisywane. Pomiń (⌘.) zamyka kartę i zostawia znak w zestawie. ⌥-klik na dowolnym aktywnym znaku paska Kocha otwiera jego powtórkę.
Przepisywanie
Na ekranie pojawia się znak albo grupa. Nadajesz to łapkami. Wynik pokazuje to, co nadałeś, obok tego, co było pokazane, znak po znaku.
Jak używać
- Wybierz materiał: Grupy, Pojedyncze albo Do skutku.
- Naciśnij Zacznij przepisywanie albo Return.
- Przeczytaj element z ekranu i odstukaj go.
- Przestań kluczować. Dwie sekundy ciszy kończą odpowiedź.
- Przeczytaj wynik: błędny znak jest przekreślony, a obok stoi oczekiwany.
Uwagi
- Nic nie jest odtwarzane przed nadaniem. Element jest tylko pokazany. Tym różni się od Echo.
- Naciśnij / albo przycisk ?, żeby zobaczyć wzór bieżącego elementu.
- Przepisywanie korzysta z zestawu znaków do nadawania, tego samego co Echo. Dodaj następny znak po sesji Grupy albo Pojedyncze z co najmniej 10 znakami na 90% lub lepiej, albo po ukończonej sesji Do skutku.
- Do skutku trwa, aż każdy znak zestawu zdobędzie docelową liczbę trafień. Błąd zabiera punkt. Ukończenie odblokowuje następny znak niezależnie od procentu. Przy limicie błędów ustawionym w Ustawieniach sesja kończy się na N-tym błędzie i niczego nie odblokowuje.
- W trakcie sesji stopka liczy błędy („Błędy: N”): znaki nadane źle od początku tej sesji.
- Dodaj następny znak po wyniku albo kliknięcie w pasek Kocha o jeden znak za zestawem otwiera kartę nowego znaku: znak, jego wzór, jedno odtworzenie. Zacznij rozgrzewkę pokazuje pojedyncze znaki, nowy i dwa stojące przed nim, a Ty nadajesz każdy, aż nowy zdobędzie cel z trybu Do skutku. Nic nie jest zapisywane. Pomiń (⌘.) zamyka kartę i zostawia znak w zestawie. ⌥-klik na dowolnym aktywnym znaku paska Kocha otwiera jego powtórkę.
Słowa i znaki wywoławcze
Ten sam przebieg co w sekcji Odbiór, ale z prawdziwym materiałem: częste słowa, skróty CW i znaki wywoławcze. Wszystko jest ułożone wyłącznie ze znaków aktywnych w Twoim zestawie odbioru.
Jak używać
- Wybierz materiał: Słowa albo Znaki wywoławcze.
- Naciśnij Zacznij sesję albo Return.
- Poczekaj na „Słuchaj…”, potem wpisz, co usłyszałeś, i naciśnij Return.
- Przeczytaj wynik. Return przy pustym polu odtwarza element ponownie.
Uwagi
- Słowa mieszają codzienne wyrazy ze skrótami CW, takimi jak CQ, TU czy 73, na tyle, na ile pozwala aktywny zestaw.
- Znaki wywoławcze mają realistyczną budowę: prefiks, cyfra, sufiks. Wymagają co najmniej jednej cyfry i kilku liter w aktywnym zestawie.
- Przy małym zestawie lista bywa pusta. Sidetone wtedy o tym mówi. Dodaj więcej znaków w sekcji Odbiór i wróć.
- Prędkości i podpowiedź wzoru (⌘/) działają tak samo jak w sekcji Odbiór.
Postępy
Wszystkie liczby w jednym miejscu: jak idzie każdy znak i jak wypadły sesje, osobno dla odbioru i dla nadawania.
Jak używać
- Otwórz sekcję Postępy.
- Przeczytaj siatkę znaków. Każde pole pokazuje trafienia z ostatnich 50 prób na tym znaku oraz jego wzór.
- Przeczytaj wykres. Jeden punkt na sesję, skuteczność w czasie.
- Ukończ sesję w dowolnej innej sekcji, a liczby się zaktualizują.
Uwagi
- Siatka to informacja, nie próg. Następny znak odblokowuje pojedyncza sesja Grupy albo Pojedyncze z co najmniej 10 znakami na 90% lub lepiej, albo ukończona sesja Do skutku, nie siatka.
- Odbiór i nadawanie są liczone osobno, każde z własnym zestawem znaków.
- Eksportuj JSON… zapisuje wszystkie sesje i statystyki znaków do pliku.
- Wyzeruj postępy… usuwa statystyki znaków i historię sesji. Ustawienia zostają.
Ustawienia
Otwórz skrótem ⌘,. Trzy zakładki: Klucz, Dźwięk i Trening. Zmiany działają od razu.
Jak używać
- Klucz: wybierz preset łapek albo Własne i naciśnij własne klawisze w polach. Ustaw tryb keyera (Iambic A, Iambic B, Klucz sztorcowy) i WPM keyera.
- Dźwięk: ustaw ton w Hz, głośność i Miękkość zboczy w ms.
- Trening: ustaw prędkość znaku i prędkość efektywną w sekcji Tempo, sprawdź kolejność znaków, ustaw cel trybu Do skutku i Limit błędów w Do skutku.
Uwagi
- Presety: vBand (lewy i prawy Control), Jedna ręka (, i .), Strzałki, Własne. Klucz sztorcowy używa lewego klawisza Control.
- Miękkość zboczy to czas narastania i opadania każdego tonu. Poniżej 3 ms ton klika, powyżej 10 ms znaki rozmywają się przy 20 WPM. 5 ms to bezpieczna wartość.
- Tempo: prędkość znaku to tempo każdego znaku, prędkość efektywna to odstępy między nimi (Farnsworth). Prędkość efektywna nigdy nie przekracza prędkości znaku.
- Kolejność znaków to sekwencja G4FON. Obsługiwane są litery, cyfry oraz . , ? / =.
- Cel trybu Do skutku to liczba trafień, jaką musi zdobyć każdy znak, zanim sesja się skończy: od 2 do 5, domyślnie 3. Ukończona sesja Do skutku odblokowuje następny znak.
- Limit błędów w Do skutku kończy sesję Do skutku na N-tym błędzie: Bez limitu (domyślnie), 3 albo 5. Sesja przerwana limitem nie odblokowuje następnego znaku.
- Ustawienia i postępy zostają w kontenerze aplikacji na tym Macu. Nic nie jest wysyłane do chmury.
Skróty klawiszowe
Większość Sidetone obsłużysz z klawiatury, więc ręce zostają na kluczu.
Skróty
- Return: start sesji, wysłanie odpowiedzi w sekcjach Odbiór i Słowa, ponowne odtworzenie elementu w Echo i po wyniku.
- ⌘/: pokaż wzór bieżącego elementu w sekcjach Odbiór i Słowa.
- /: pokaż wzór bieżącego elementu w Echo i Przepisywaniu.
- Escape: zatrzymaj sesję.
- ⌘.: pomija kartę nowego znaku.
- ⌥-klik na pasku Kocha: powtórka znaku, który już znasz.
- ⌘,: otwórz Ustawienia.
- ⌘?: otwórz Pomoc.
- Środkowy przycisk myszy na polu myszy: odtwórz ponownie w Echo, pokaż wzór w Przepisywaniu, wyczyść w Nadawaniu.
Uwagi
- Pole myszy działa też jak łapki: lewy przycisk to dit, prawy to dah.
- Klawisze łapek wynikają z presetu w Ustawieniach, zakładka Klucz.